OCS 2007 Installation – Part 1
Assumed Pre-Existing Environment
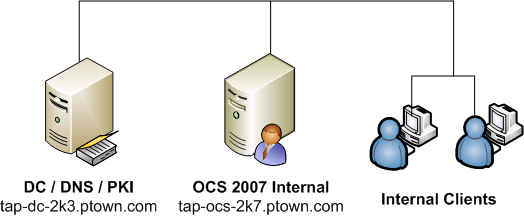
This will be the first part of many in showing the steps necessary for standing up an OCS 2007 server. In the examples that follow the internal domain name is ptown.com and the SIP domain, or my external facing address will be confusedamused.com
tap-dc-2k3.ptown.com
- Domain Controller for ptown.com
- DNS Server for ptown.com
- Certificate Authority named P-Town Certificate Authority
- Domain in 2003 Native Mode
- IP Configuration: 192.168.0.10 / 24
- Gateway: 192.168.0.1
- DNS: 127.0.0.1
tap-ocs-2k7.ptown.com
- Blank Windows 2003 Server joined to the ptown.com domain
- IIS Installed with ASP.net enabled
- Adminpak.exe installed
- IP Configuration: 192.168.0.20 / 24
- Gateway: 192.168.0.1
- DNS: 192.168.0.10
Schema Preparation
On tap-ocs-2k7.ptown.com run the setup.exe application to start the installation. You’ll see a message that the Visual C++ 2005 redistributable must be installed. Click Yes.
![clip_image002[6]](http://images.squarespace-cdn.com/content/v1/56e500c2e321404618f27dd4/1458517489621-SEELSSRFYRQKZMKBGJ84/clip-image0026.jpg)
On the main setup screen click Deploy Standard Edition Server.
![clip_image004[6]](http://images.squarespace-cdn.com/content/v1/56e500c2e321404618f27dd4/1458517493522-LC0JKCKE9Y7RKI6A1SUT/clip-image0046.jpg)
Now click Prepare Active Directory.
![clip_image006[6]](http://images.squarespace-cdn.com/content/v1/56e500c2e321404618f27dd4/1458517497222-1M0GFVB8J4WC0K67EO55/clip-image0066.jpg)
Press the Run button under Prep Schema.
![clip_image008[6]](http://images.squarespace-cdn.com/content/v1/56e500c2e321404618f27dd4/1458517501222-TKHDNGWOVRSTNFPVG1U4/clip-image0086.jpg)
The Schema Preparation Wizard starts. Click Next.
![clip_image010[6]](http://images.squarespace-cdn.com/content/v1/56e500c2e321404618f27dd4/1458517504722-M1ZI0EFPEYP8LND38WRM/clip-image0106.jpg)
Assuming the installation media has not been modified, the schema files should be in the same directory as setup so press Next.
![clip_image012[6]](http://images.squarespace-cdn.com/content/v1/56e500c2e321404618f27dd4/1458517508222-LF2P2XCK0D7TS4OG8DJA/clip-image0126.jpg)
Press Next again to start the schema preparation.
![clip_image014[6]](http://images.squarespace-cdn.com/content/v1/56e500c2e321404618f27dd4/1458517510731-RVEY3MVY1ADLZQPOMRHE/clip-image0146.jpg)
A success dialog will appear when it finishes. Check the box to view the log if desired, but press Finish to continue.
![clip_image016[6]](http://images.squarespace-cdn.com/content/v1/56e500c2e321404618f27dd4/1458517514646-V18V39FOE4MDXIKM1RBM/clip-image0166.jpg)
At this point you should wait and then verify the schema has replicated to all domain controllers in the forest before continuing.
Forest Preparation
Press the Run button under Prep Forest.
The Forest Preparation Wizard starts. Press Next.
![clip_image018[6]](http://images.squarespace-cdn.com/content/v1/56e500c2e321404618f27dd4/1458517516522-FECU4JCZCSEDVW38TC7C/clip-image0186.jpg)
Leave the default selection of System container in the root domain and press Next.
![clip_image020[6]](http://images.squarespace-cdn.com/content/v1/56e500c2e321404618f27dd4/1458517518221-LO7MQTD3YWATYA7329BM/clip-image0206.jpg)
Select forest root domain, ptown.com in the drop down and press Next.
![clip_image022[6]](http://images.squarespace-cdn.com/content/v1/56e500c2e321404618f27dd4/1458517520222-NQH2N3Y546XXDTIYUV46/clip-image0226.jpg)
Select the external SIP domain, confusedamused.com, for default routing and press Next.
![clip_image024[6]](http://images.squarespace-cdn.com/content/v1/56e500c2e321404618f27dd4/1458517521922-V2AJ24CQCQK3JK1E3FM4/clip-image0246.jpg)
Confirm the forest preparation settings and press Next.
![clip_image026[6]](http://images.squarespace-cdn.com/content/v1/56e500c2e321404618f27dd4/1458517522134-WNLNHODPQ1L63C144QE8/clip-image0266.jpg)
A success dialog will appear when it finishes. Check the box to view the log if desired, but press Finish to continue.
![clip_image028[6]](http://images.squarespace-cdn.com/content/v1/56e500c2e321404618f27dd4/1458517524023-20SX8KKA7GCNTYAYWWD7/clip-image0286.jpg)
Again, wait for the changes to be replicated to the entire forest before continuing.
Domain Preparation
Press the Run button under Prep Domain.
The Domain Preparation Wizard starts. Press Next.
![clip_image030[6]](http://images.squarespace-cdn.com/content/v1/56e500c2e321404618f27dd4/1458517525534-OILR5RNTN6BV6D5AZQ8D/clip-image0306.jpg)
Press Next to acknowledge the warning about group creation.
![clip_image032[6]](http://images.squarespace-cdn.com/content/v1/56e500c2e321404618f27dd4/1458517526421-1FM4NCODO5Y6COX99JDB/clip-image0326.jpg)
Confirm the domain preparation settings and press Next. ![clip_image034[6]](http://images.squarespace-cdn.com/content/v1/56e500c2e321404618f27dd4/1458517528531-HGACOS7CJUC43W7HI4X1/clip-image0346.jpg)
A success dialog will appear when it finishes. Check the box to view the log if desired, but press Finish to continue.
![clip_image036[6]](http://images.squarespace-cdn.com/content/v1/56e500c2e321404618f27dd4/1458517528934-L8V2LPCEHKIC66C7X740/clip-image0366.jpg)
This time wait for the changes to be replicated to the entire domain OCS is being deployed within. Run the domain preparation wizard for any other domains hosting OCS.
At this point OCS admin rights can be delegated to users and groups. This can also be accomplished later by running the wizard again. Press the Deploy Standard Edition link at the top to go back and deploy the Standard Edition Server.
Deploy Server
Click the Run button under Deploy Server to start the installation process.
The Deploy Server Wizard starts. Press Next.
![clip_image038[6]](http://images.squarespace-cdn.com/content/v1/56e500c2e321404618f27dd4/1458517529421-RROR3099KEBY02VTLFFY/clip-image0386.jpg)
Accept the license terms and press Next.
![clip_image040[6]](http://images.squarespace-cdn.com/content/v1/56e500c2e321404618f27dd4/1458517530024-R5604BQC4MLHEL6A7UVW/clip-image0406.jpg)
Choose an installation location and press Next.
![clip_image042[6]](http://images.squarespace-cdn.com/content/v1/56e500c2e321404618f27dd4/1458517531122-JC0EEXU7S0NFL6KAD4OF/clip-image0426.jpg)
Enter a password for the RTCService account and press Next.
![clip_image044[6]](http://images.squarespace-cdn.com/content/v1/56e500c2e321404618f27dd4/1458517531938-9FBCF0AE7R8889R6M3ZI/clip-image0446.jpg)
Enter a password for the RTCComponent account and press Next.
![clip_image046[6]](http://images.squarespace-cdn.com/content/v1/56e500c2e321404618f27dd4/1458517532623-Z2E8W2VX8MRCECFI8OWI/clip-image0466.jpg)
Accept the default blank external web farm FQDN’s for now. The external address will adjusted later. Press Next.
![clip_image048[6]](http://images.squarespace-cdn.com/content/v1/56e500c2e321404618f27dd4/1458517532832-7S6CKR8H05MOTLQ3OJI7/clip-image0486.jpg)
Select a location for the database and transaction logs. Ideally, these should be on separate disk controllers. Press Next.
![clip_image050[6]](http://images.squarespace-cdn.com/content/v1/56e500c2e321404618f27dd4/1458517533722-ODA4V7T11HAI8SHRT73Q/clip-image0506.jpg)
Review the configuration settings and press Next to start the installation.
![clip_image052[6]](http://images.squarespace-cdn.com/content/v1/56e500c2e321404618f27dd4/1458517534322-8D0E1Z2LFY7P9LWAG2A2/clip-image0526.jpg)
A success dialog will appear when it finishes. Check the box to view the log if desired, but press Finish to continue.
![clip_image054[6]](http://images.squarespace-cdn.com/content/v1/56e500c2e321404618f27dd4/1458517535873-AT4BJEHCSA4NAQSAMTCE/clip-image0546.jpg)
Configure Server
The Deploy Server section should now have a green checkmark next to it. Click the Run button under Configure Server to continue.
![clip_image056[6]](http://images.squarespace-cdn.com/content/v1/56e500c2e321404618f27dd4/1458517536523-XIRP1OWIKPQH8A25J6QS/clip-image0566.jpg)
The Configure Pool/Server Wizard should start. Press Next to continue.
![clip_image058[6]](http://images.squarespace-cdn.com/content/v1/56e500c2e321404618f27dd4/1458517536827-Y4ER9Z34XRSYS0PU8LG6/clip-image0586.jpg)
Press Next to accept the only server installed so far, tap-ocs-2k7.ptown.com.
![clip_image060[6]](http://images.squarespace-cdn.com/content/v1/56e500c2e321404618f27dd4/1458517537223-9MRQI0HG7BHSNY1CIYB3/clip-image0606.jpg)
The SIP domain was already entered earlier, but additional SIP domains can be added here. Press Next to continue.
![clip_image062[6]](http://images.squarespace-cdn.com/content/v1/56e500c2e321404618f27dd4/1458517538038-B5FR5LRIJ5QFBRKKH05B/clip-image0626.jpg)
Choose the option Some or all clients will use DNS SRV records for automatic logon and check the box Use this server or pool to authenticate and redirect automatic client logon requests. Press Next.
![clip_image064[6]](http://images.squarespace-cdn.com/content/v1/56e500c2e321404618f27dd4/1458517539421-8HSGF7D6TLRE17H3D6R6/clip-image0646.jpg)
Choose the SIP domain for automatic logon, confusedamused.com and press Next.
![clip_image066[6]](http://images.squarespace-cdn.com/content/v1/56e500c2e321404618f27dd4/1458517540123-FX9MBNNHLT2Y2DMD8W1G/clip-image0666.jpg)
Select Do not configure for external access now and press Next.
![clip_image068[6]](http://images.squarespace-cdn.com/content/v1/56e500c2e321404618f27dd4/1458517540633-UL0C8N2O2NN2DFT57GUY/clip-image0686.jpg)
Review the configuration settings and press Next to begin the configuration.
![clip_image070[6]](http://images.squarespace-cdn.com/content/v1/56e500c2e321404618f27dd4/1458517541121-9F0QIPJ3R3BTZQGLRK76/clip-image0706.jpg)
A success dialog will appear when it finishes. Check the box to view the log if desired, but press Finish to continue.
![clip_image072[6]](http://images.squarespace-cdn.com/content/v1/56e500c2e321404618f27dd4/1458517541534-DJUBIM8KS5T1MZAWXXFF/clip-image0726.jpg)
That concludes Part 1 of this series. Not very interesting yet, or hard to screw up either. The other parts should be much more interesting.